Panel Light Product
Panel Light Installation
- These illustrations are for demonstration purposes only
- Always follow cut marks provided in user manual
- Only cut on the marks provided on the fixture housing
- When applying linear solutions to a channel, make sure to use an appropriate silicone adhesive between the base of the channel profile and the fixture housing to eliminate stretching over time.
INSTALLATION PROCESS
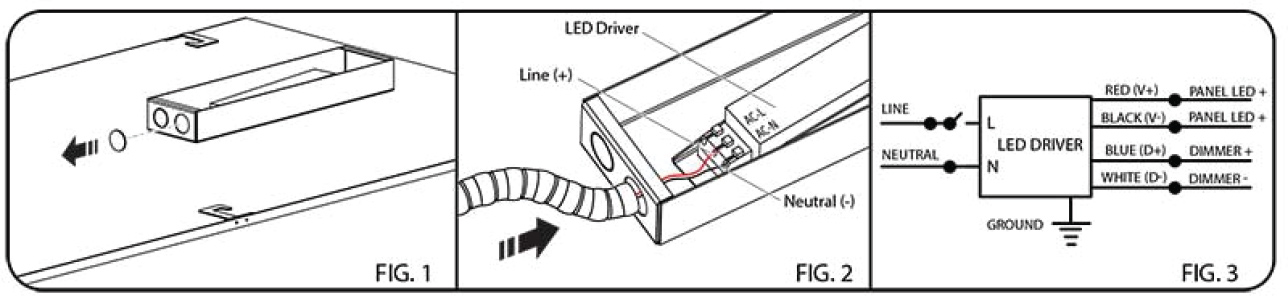
1. Connecting the Power Supply
Connecting the Power Supply
1.Remove the knock-out hole on the end of the LED driver box (Fig.1).
2.Run conduit with AC wiring through the hole to the LED driver and connect wiring (Fig.2).
3.Wiring connections are shown in the diagram in Fig.3.
2. Mounting Option 1: Built-In
Suspension Hooks
1.Pull suspension hook away from panel until facing perpendicular to the panel backing (Fig.4)
2.Bend hook arm until facing perpendicular to the hook body (Fig.5).
3.Hook panel light onto t-bars until panel is fully supported (Fig.6).

2. Mounting Option 2: Suspension Kit
Suspension Kit
1.Detach the ceiling cable from the cable tightener using the release button. Mount the ceiling bracket using two screws (not included) (Fig.7).
2.Remove the suspension hook by removing the two screws, insert the panel suspension bracket into the panel slot, and re-fasten the screws (Fig.8).
3.Re-thread the ceiling cable through the cable tightener until panel is suspended in desired position (Fig.9).